trinityamps.com

Trinity Amps Guitar Amp Forum
It is currently Thu May 16, 2024 7:15 pm

All times are UTC - 5 hours [ DST ]


Post new topic Reply to topic  [ 10 posts ] 
Author Message
PostPosted: Sat Feb 02, 2013 11:33 pm 
Offline
Expert
Expert

Joined: Sat Dec 04, 2010 3:42 pm
Posts: 519
Location: Qualicum Beach, BC
Hi, my name is Mitch and I live near Vancouver. This is my first post but I've been a member ever since I started building tube amps a couple of years ago. The Tweed Deluxe I recently completed is my seventh build. My first was another Trinity amp, a TC-15. I've been building electronic projects and doing woodwork since I was a teenager, though. I won't say how long ago that was, let's just say I had my first set of speakers finished in time for the release of Dark Side of the Moon!

I wanted a combo amp that's light and portable and I've always liked the sound of 5E3's. There are lots of 5E3 kits available. I picked Trinity's because I've dealt with Stephen before so I knew they have great products and great customer service. Also since I live in Canada I like to deal with Canadian companies whenever possible. There's a good video demo of a Trinty 5E3 done by a fellow known as keithb7 on YouTube. There's a link to it on the Tweed Deluxe page on Trinity's site. Watching that video clinched the deal.

I arranged with Stephen to buy the kit and a cabinet. Normally I build my own cabinets. Trinity's are very well made, though, and this time it was just easier to buy their cabinet. I've installed Tolex in the past with good results but never tweed. Stephen suggested that I get the cabinet with the tweed unfinished and put on the shellac myself. I went with this option and saved a bit of money.

The kit was shipped promptly and it arrived safely. It went together fairly quickly with no issues. It worked the first time and sounds great! Here's a picture. I took lots more during the build. There's a limit to how much you can write in each message here, so I'll have to post a couple of more messages with some of the other photos and comments.

Attachment:
Done001.jpg
Done001.jpg [ 681.73 KiB | Viewed 4310 times ]


Mitch Markin
Port Coquitlam, BC


Last edited by mitch m on Thu Jul 16, 2020 2:01 am, edited 6 times in total.

Top
 Profile  
 
 Post subject: Re: West Coast Tweed
PostPosted: Sat Feb 02, 2013 11:36 pm 
Offline
Expert
Expert

Joined: Sat Dec 04, 2010 3:42 pm
Posts: 519
Location: Qualicum Beach, BC
The story continues... Here is more detail about building the chassis.

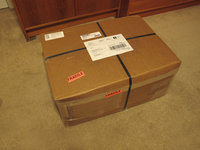
Everything arrived in one box, very well packed. The transformers were mounted to the chassis and the chassis was mounted to the cabinet. The electronic parts were packed in plastic bags inside the chassis.

Attachment:
Kit1.jpg
Kit1.jpg [ 273.65 KiB | Viewed 4310 times ]


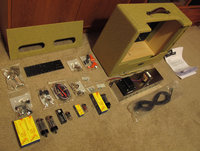
The chassis, transformers and the rest of the electronic parts are all first-rate and the cabinet is a work of art.

Attachment:
Kit6.jpg
Kit6.jpg [ 361.51 KiB | Viewed 4310 times ]


The documentation that comes with the kit is excellent. There is a lot of background information as well as step by step instructions and photos for those who need them. I mainly just followed the layout drawing and the schematic. I checked the parts I received and found that everything was there.

I began by installing all the tube sockets, pots, switches and jacks on the chassis. Then I wired up the AC, the power transformer, the heaters, the output transformer secondary, the jacks and the pots.

Attachment:
ChassisWiring001.jpg
ChassisWiring001.jpg [ 466.49 KiB | Viewed 4310 times ]

Attachment:
ChassisWiring002.jpg
ChassisWiring002.jpg [ 456.03 KiB | Viewed 4310 times ]

Attachment:
ChassisWiring004.jpg
ChassisWiring004.jpg [ 440.55 KiB | Viewed 4310 times ]

Attachment:
ChassisWiring005.jpg
ChassisWiring005.jpg [ 458.06 KiB | Viewed 4310 times ]

Attachment:
ChassisWiring006.jpg
ChassisWiring006.jpg [ 426.68 KiB | Viewed 4310 times ]

Attachment:
ChassisWiring007.jpg
ChassisWiring007.jpg [ 411.57 KiB | Viewed 4310 times ]


Now that the power supply was wired I could give the amp its first test. No tubes were in yet, of course. I double checked all the wiring I had done so far. Then I plugged in the AC cord and flipped on the power switch. The pilot light lit up. I measured about 6.3 VAC across the heater pins at each preamp and power amp tube socket. I also checked that there was about 3.15 VAC from each heater pin to ground. I measured 5 VAC across the heater pins for the rectifier tube. I also carefully measured the high voltage coming out of the power transformer at the rectifier tube's socket. Each leg read about 350 VAC with respect to ground.

I started working on the eyelet board next. I installed all the wiring on the bottom side, then I started working from left to right installing the resistors and capacitors on the top side. I also attached all the flyoff leads using the 6" or 8" lengths recommended in the assembly manual. This turned out to be more than enough length and more than enough wire was supplied.

Once all the wires or components that go into an eyelet were in place I soldered the eyelet. Before that the wires were just passed through the eyelet and bent over to hold them in place. In the following photo you can see the second eyelet from the left at the bottom isn't soldered yet. That's where the output transformer's center tap and the B+ will connect later.

Attachment:
BoardTop.jpg
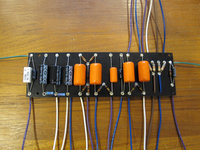
BoardTop.jpg [ 299.39 KiB | Viewed 4310 times ]

Attachment:
BoardBottom.jpg
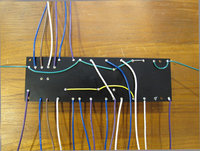
BoardBottom.jpg [ 287.5 KiB | Viewed 4310 times ]


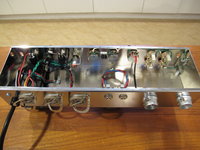
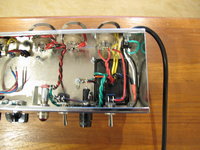
All that was left now was to attach the flyoff wires coming from the eyelet board to the tube sockets, pots and jacks.

Attachment:
FinishedChassis001.jpg
FinishedChassis001.jpg [ 550.39 KiB | Viewed 4310 times ]

Attachment:
FinishedChassis002.jpg
FinishedChassis002.jpg [ 557.7 KiB | Viewed 4310 times ]


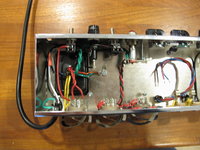
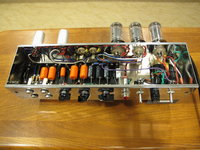
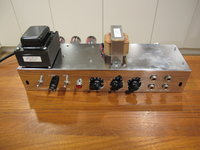
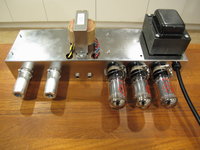
The amp was now finished and ready for final testing. I checked my wiring very carefully. First visually using the layout, then I used an ohmmeter and the schematic to make sure everything that's supposed to be connected actually was connected. I did one more check to make sure there weren't any shorts and the polarity was right on all the electrolytic capacitors. All was good, so I plugged in the rectifier tube and applied power.

It passed the smoke test. It also passed all the voltage checks. I powered it down, waited for the capacitors to discharge, then I plugged in the preamp tubes. I powered it up again and they all glowed normally, there was still no smoke and all the voltages were still good.

I powered it down, waited for the capacitors to discharge, then I plugged in the power tubes and a dummy load. I applied power again. All the tubes glowed normally. There was still no smoke, no signs of red plating on the 6V6's and all the voltages were good. I powered it down again and plugged in a speaker and a guitar for the first time. I fired it up and it worked like a charm!
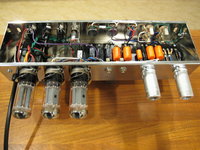
Attachment:
FinishedChassis004.jpg
FinishedChassis004.jpg [ 409.02 KiB | Viewed 4310 times ]

Attachment:
FinishedChassis005.jpg
FinishedChassis005.jpg [ 457.97 KiB | Viewed 4310 times ]


Mitch Markin
Port Coquitlam, BC


Last edited by mitch m on Thu Jul 16, 2020 2:20 am, edited 8 times in total.

Top
 Profile  
 
 Post subject: Re: West Coast Tweed
PostPosted: Sat Feb 02, 2013 11:51 pm 
Offline
Expert
Expert

Joined: Sat Dec 04, 2010 3:42 pm
Posts: 519
Location: Qualicum Beach, BC
The story continues.... Here is more detail about finishing the cabinet and the final assembly.

First I removed the handle, feet and speaker panel from the cabinet. Then I applied a couple of coats of shellac. I used Zinser Amber shellac mixed about 50/50 with Zinser clear shellac. I didn't want the cabinet to be too dark. I didn't want it to be really yellow either, the way the tweed looks naturally. This mix worked pretty well. It sealed the tweed and darkened it the amount I wanted. I applied it with a brush and sanded with 220 grit paper after each coat. Then I sprayed on four coats of clear lacquer inside and out to give the cabinet a tough durable finish.

It was easy enough to do the finishing, but I didn't really save enough money to justify me doing it instead of Trinity.

I re-installed the handle, feet and speaker panel. I mounted the chassis and a speaker in the cabinet. I used a 12" Jensen P12Q like the originals had.

Attachment:
Done005.jpg
Done005.jpg [ 697.83 KiB | Viewed 4310 times ]

Attachment:
Done006.jpg
Done006.jpg [ 728.05 KiB | Viewed 4310 times ]

Attachment:
Done007.jpg
Done007.jpg [ 581 KiB | Viewed 4310 times ]


I put on the back panel and the project was done!

Attachment:
Done003.jpg
Done003.jpg [ 682.61 KiB | Viewed 4310 times ]

Attachment:
Done004.jpg
Done004.jpg [ 818.4 KiB | Viewed 4310 times ]

Attachment:
Done001.jpg
Done001.jpg [ 681.73 KiB | Viewed 4310 times ]

Attachment:
Done002.jpg
Done002.jpg [ 673.22 KiB | Viewed 4310 times ]


The kit went together very well and it worked the first time. It was a lot of fun to build, too. I've had a chance to use this amp for a few weeks now. It sounds great and I can see that I'll also have a lot of fun playing it. I don't hesitate for a moment to recommend Trinity to anyone who wants a great amp, especially if they want the pride that comes with building it themselves.

Mitch
Port Coquitlam, BC


Last edited by mitch m on Thu Jul 16, 2020 2:27 am, edited 3 times in total.

Top
 Profile  
 
 Post subject: Re: West Coast Tweed
PostPosted: Sun Feb 03, 2013 12:53 am 
Offline
Holy Ghost
Holy Ghost
User avatar

Joined: Sun Mar 13, 2005 4:10 pm
Posts: 7519
Location: Canada
Thanks for a great pictorial and endorsement. The build looks excellent, you obviously know how to do a great build. Your amp looks marvellous!

_________________
Stephen
Web: www.trinityamps.com. Facebook: facebook.com/trinityamps. Twitter: @trinityamps


Top
 Profile  
 
 Post subject: Re: West Coast Tweed
PostPosted: Sun Feb 03, 2013 12:59 am 
Offline
Expert
Expert

Joined: Sat Dec 04, 2010 3:42 pm
Posts: 519
Location: Qualicum Beach, BC
Thanks Stephen. I'll have to work on a post about the TC-15 now. I've been meaning to do that for a couple of years!

Mitch


Top
 Profile  
 
 Post subject: Re: West Coast Tweed
PostPosted: Sun Feb 03, 2013 1:09 am 
Offline
Expert
Expert
User avatar

Joined: Sun Feb 17, 2008 4:47 pm
Posts: 960
Location: Toronto, Canada.
That is a great looking amp. Very authentic!

_________________
http://pdfelectronics.com


Top
 Profile  
 
PostPosted: Thu Jan 02, 2014 1:01 am 
Offline
Expert
Expert

Joined: Sat Dec 04, 2010 3:42 pm
Posts: 519
Location: Qualicum Beach, BC
I opened the amp up a couple of days ago to check the voltages. Everything is still good. It still sounds great and it's still the amp I use most of the time.

I also checked the power output. With a 1kHz sine wave going in it puts out 11 VAC RMS into an 8 ohm resistor just before clipping. That's 15 watts RMS (Ohm's Law, P=V^2/R).


Top
 Profile  
 
PostPosted: Thu Jan 02, 2014 10:47 am 
Offline
Holy Ghost
Holy Ghost
User avatar

Joined: Sun Mar 13, 2005 4:10 pm
Posts: 7519
Location: Canada
Good update. I always say a Tweed puts out about 15 watts, but they get driven hard so people tend to get a little more out of them.

_________________
Stephen
Web: www.trinityamps.com. Facebook: facebook.com/trinityamps. Twitter: @trinityamps


Top
 Profile  
 
PostPosted: Tue Feb 11, 2014 2:14 am 
Offline
Expert
Expert

Joined: Sat Dec 04, 2010 3:42 pm
Posts: 519
Location: Qualicum Beach, BC
Yes, they sound great clean but the fun is driving them hard.

While I was in there I neatened up a few of the wire runs. I thought I got it pretty good the first time, but then I saw Olivia's pictures!

Attachment:
Redo 013.jpg
Redo 013.jpg [ 136.81 KiB | Viewed 11407 times ]


Attachment:
Redo 003.jpg
Redo 003.jpg [ 123.35 KiB | Viewed 11407 times ]


Top
 Profile  
 
PostPosted: Tue Feb 11, 2014 9:27 am 
Offline
Holy Ghost
Holy Ghost
User avatar

Joined: Sun Mar 13, 2005 4:10 pm
Posts: 7519
Location: Canada
Appreciate the update. Still looking great!

_________________
Stephen
Web: www.trinityamps.com. Facebook: facebook.com/trinityamps. Twitter: @trinityamps


Top
 Profile  
 
Display posts from previous:  Sort by  
Post new topic Reply to topic  [ 10 posts ] 

All times are UTC - 5 hours [ DST ]


Who is online

Users browsing this forum: No registered users and 17 guests


You cannot post new topics in this forum
You cannot reply to topics in this forum
You cannot edit your posts in this forum
You cannot delete your posts in this forum
You cannot post attachments in this forum

Search for:
Jump to:  
Powered by phpBB® Forum Software © phpBB Group