trinityamps.com

Trinity Amps Guitar Amp Forum
It is currently Sun Apr 28, 2024 5:08 pm

All times are UTC - 5 hours [ DST ]


Post new topic Reply to topic  [ 113 posts ]  Go to page 1, 2, 3, 4, 5, 6  Next
Author Message
PostPosted: Tue May 12, 2009 1:11 am 
Offline
Novice
Novice
User avatar

Joined: Wed Dec 03, 2008 11:24 am
Posts: 103
Location: Naples, FL
Well, I couldn't resist any longer. As a Hiwatt fanatic, I just had to build a Trinity Triwatt! I've built several Hiwatt clones and a Marwatt, and have been considering doing a 6V6 Hiwatt for a while. After seeing and hearing this amp, decided to do this instead. I play in a classic rock cover band, and normally use a 50 watt, often attenuated in some of the smaller places we play.

I have a bunch of leftover bits and pieces from various builds, so Stephen was kind enough to sell me the trannies and board.

I am using a Hiwatt sized chassis, mainly because I want to use this amp with my Swanson 2-12 that I currently houses my Jimmy Page 50 watter or one of my Hiwatt sized head cabs. It is way overkill, but it will leave a TON of room for an effects loop and some other stuff, like a built in cab simulator for feeding the PA. Plus, I already have one!

I love a blank canvas!

http://i724.photobucket.com/albums/ww250/HiwattJP504/001-1.jpg?t=1242105178

http://i724.photobucket.com/albums/ww250/HiwattJP504/004-1.jpg?t=1242103408

[img][url]http://i724.photobucket.com/albums/ww250/HiwattJP504/002-1.jpg?t=1242103445[/url

The first issue is gonna be where to put the extra OD pot. I have 2 options. Eliminate the link input (and either use th Y cable I use for my 2 hole DR504, or put a mini toggle in to link them) or, use the Triwatt's progressive power switch and put the extra pot in the pilot light hole. I haven't decided which I'm gonna do yet, but I am leaning towards the linked input hole. What can I say, I am a purist...... I like the separate stby and power switches!

Once I figure this issue out, I will order a custom faceplate.


This is the cab I plan to use with it. The TRIWATT name on my Jimmy Page 50 watter is a complete coincidence and is based on the username I've been using in various forums for the last 11 years. Here http://www.vintagehiwattconvention.com/forum/viewtopic.php?f=5&t=12 is the first time I used it, but didn't put the name on that amp. I put a Hiwatt plate on it instead. The JP was the next one I did, so it got the TRIWATT plates. I built it last fall.


http://i724.photobucket.com/albums/ww250/HiwattJP504/008-1.jpg?t=1242105062

I am looking forward to making some solder smoke! I'll do some chassis prep tomorrow. I need to install the angle brackets to mount it in the combo, as well as the nut plates for head cab mounting. I will order plates for both, as the chassis mounts upside down in the combo cab.


:edit: I don't know why the pics aren't showing up.......


Last edited by Tripower455 on Fri May 15, 2009 11:06 pm, edited 1 time in total.

Top
 Profile  
 
 Post subject:
PostPosted: Tue May 12, 2009 1:35 am 
Offline
Novice
Novice
User avatar

Joined: Wed Dec 03, 2008 11:24 am
Posts: 103
Location: Naples, FL
empty71 wrote:


Really? Shouldn't the tags make them appear in the post?


Top
 Profile  
 
 Post subject:
PostPosted: Tue May 12, 2009 6:55 am 
Offline
Experienced
Experienced

Joined: Fri Mar 14, 2008 12:05 pm
Posts: 432
Location: Massachusetts
At the bottom of this thread there are some Photobucket posting suggestions...
viewtopic.php?t=781

At some point though, Photobucket went Democrat on us. You still get thumbnails, but the pics won't blow up directly within this site anymore :? It must be a pay only feature now...

Joe G

_________________
Some assembly required,
Brain sold separately...


Top
 Profile  
 
 Post subject:
PostPosted: Tue May 12, 2009 9:43 am 
Offline
Novice
Novice
User avatar

Joined: Wed Dec 03, 2008 11:24 am
Posts: 103
Location: Naples, FL
Ahh, so it's a Photobucket issue..... they must not like cross border postings!

I'll put them on my website and link them from there....


Top
 Profile  
 
 Post subject:
PostPosted: Tue May 12, 2009 11:40 am 
Offline
Expert
Expert
User avatar

Joined: Sun May 20, 2007 1:45 pm
Posts: 1254
Location: YYZ
I'm going to enjoy seeing this amp build develop.IMO there couldn't be a better guy than Tripower to have a Trinity Triwatt amp. :D

I'd also be interested to know how you're planning to do the FX loop.

And BTW what does the "GMC" on your combo amp's front panel stand for?

_________________
Great tones come in small glass jars!


Top
 Profile  
 
 Post subject:
PostPosted: Tue May 12, 2009 3:48 pm 
Offline
Novice
Novice
User avatar

Joined: Wed Dec 03, 2008 11:24 am
Posts: 103
Location: Naples, FL
zaphod wrote:
I'm going to enjoy seeing this amp build develop.IMO there couldn't be a better guy than Tripower to have a Trinity Triwatt amp. :D


I don't know about that, but I appreciate the sentiment!

You're a huge reason why I was able to successfully build my first 18 watter 5 years ago......

Quote:
I'd also be interested to know how you're planning to do the FX loop.


I am not sure yet. I want something that's not too invasive. There are a few "drop in" circuits available that I am considering. In any case, I will get the amp up and running well before doing any mods. That simplifies troubleshooting the inevitable BONEHEAD mistakes I will surely make during the build!

Quote:
And BTW what does the "GMC" on your combo amp's front panel stand for?


They stand for my initials!


Top
 Profile  
 
 Post subject:
PostPosted: Wed May 13, 2009 9:07 am 
Offline
Expert
Expert
User avatar

Joined: Sun May 20, 2007 1:45 pm
Posts: 1254
Location: YYZ
Well, it kind of seemed appropriate to me to have Tripower building a Trinity Triwatt, having previously built a "Triwatt" of your own. Maybe that would make your new build kind of a "TRIWATT squared" :)

Glad to know the GMC doesn't stand for General Motor Corporation! :roll: :lol:

_________________
Great tones come in small glass jars!


Top
 Profile  
 
 Post subject:
PostPosted: Wed May 13, 2009 10:04 am 
Offline
Novice
Novice
User avatar

Joined: Wed Dec 03, 2008 11:24 am
Posts: 103
Location: Naples, FL
zaphod wrote:
Well, it kind of seemed appropriate to me to have Tripower building a Trinity Triwatt, having previously built a "Triwatt" of your own. Maybe that would make your new build kind of a "TRIWATT squared" :)

Glad to know the GMC doesn't stand for General Motor Corporation! :roll: :lol:


LOL... Yeah, they killed off my 2 favorite marques, Pontiac and Olds! I am almost embarrassed to share initials with them!


Top
 Profile  
 
 Post subject:
PostPosted: Wed May 13, 2009 3:19 pm 
Offline
Experienced
Experienced
User avatar

Joined: Wed Feb 28, 2007 9:32 pm
Posts: 153
Location: Hubley, Nova Scotia
Yeah, that and you'd be headed for Chapter 11.

J


Top
 Profile  
 
 Post subject:
PostPosted: Wed May 13, 2009 6:52 pm 
Offline
Holy Ghost
Holy Ghost
User avatar

Joined: Sun Mar 13, 2005 4:10 pm
Posts: 7519
Location: Canada
I'm going to enjoy this build. Iron, board & parts on the way!

_________________
Stephen
Web: www.trinityamps.com. Facebook: facebook.com/trinityamps. Twitter: @trinityamps


Top
 Profile  
 
 Post subject:
PostPosted: Thu May 14, 2009 11:16 am 
Offline
Novice
Novice
User avatar

Joined: Wed Dec 03, 2008 11:24 am
Posts: 103
Location: Naples, FL
coco wrote:
I'm going to enjoy this build. Iron, board & parts on the way!


Me too! I am psyched!


Top
 Profile  
 
 Post subject:
PostPosted: Fri May 15, 2009 10:52 pm 
Offline
Novice
Novice
User avatar

Joined: Wed Dec 03, 2008 11:24 am
Posts: 103
Location: Naples, FL
Got a little done on the chassis today...

I fabbed the brackets that'll mount in the Swanson combo cab. I use 10-32 nut plates on all my builds. I will also put them in the spots needed to mount it in a Hiwatt head cab. These take longer than you'd think to make up right. The nutplates are semi locking, and used as is, are kind of difficult to thread a scrw in and out, especially in the confines of the cab, so I run a 10-32 tap through them to make it easier. They fit perfectly in the cab the first time (it really helps that I did one for this cab already!)

I like to do these before I do too much else. It's easier to work on an empty chassis when drilling holes and stuff.

Image

Image

Image

That's my Triwatt JP504 sitting upside down on the cab. She's a little confused right now, as I fit another amp into her home!

I'll probably start assembling the chassis after the old lady goes to bed....


Last edited by Tripower455 on Wed May 20, 2009 12:26 am, edited 1 time in total.

Top
 Profile  
 
 Post subject:
PostPosted: Mon May 18, 2009 3:01 pm 
Offline
Novice
Novice
User avatar

Joined: Wed Dec 03, 2008 11:24 am
Posts: 103
Location: Naples, FL
Signed for a package from Canada Post today! I was out getting auto parts and as I pulled in, caught the mail lady in the nick of time!


I am knee deep in working on my GTO today. I need to get the intake painted, reassembled and back on, and then I'll start more work on the Triwatt!


Top
 Profile  
 
 Post subject:
PostPosted: Tue May 19, 2009 11:53 pm 
Offline
Novice
Novice
User avatar

Joined: Wed Dec 03, 2008 11:24 am
Posts: 103
Location: Naples, FL
Well, I took a break from the GTO and got the chassis assembled tonight. My bench was already a mess from grinding and modifying my intake, so it was the perfect time to make some more steel shavings before I clean it up to start soldering.

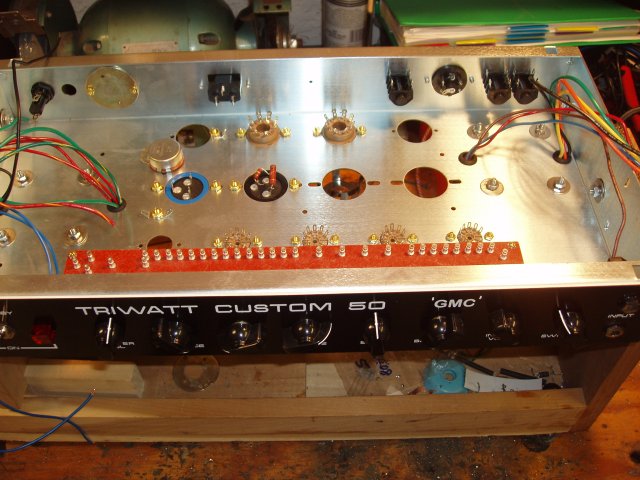
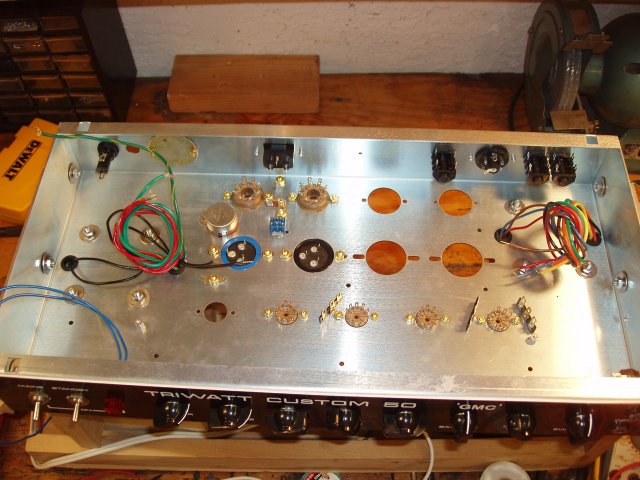
The preamp board is wider than a Hiwatt, so it's a tight fit in there. I may have to move the preamp tube sockets back a bit. I'll see when I start wiring if it's too much of a pain in the butt. If nothing else it'll keep the leads short!

Image

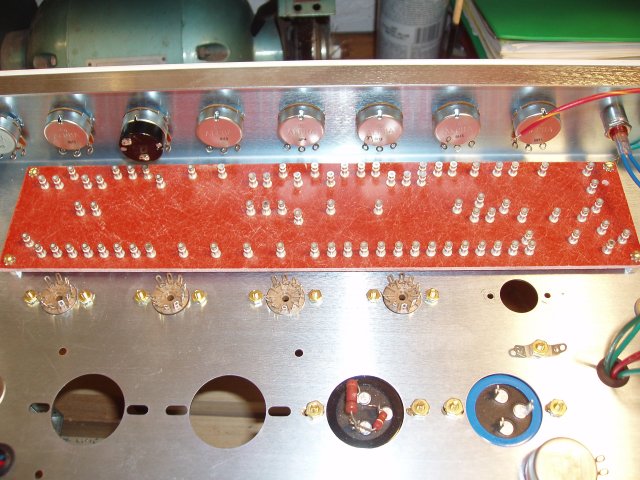
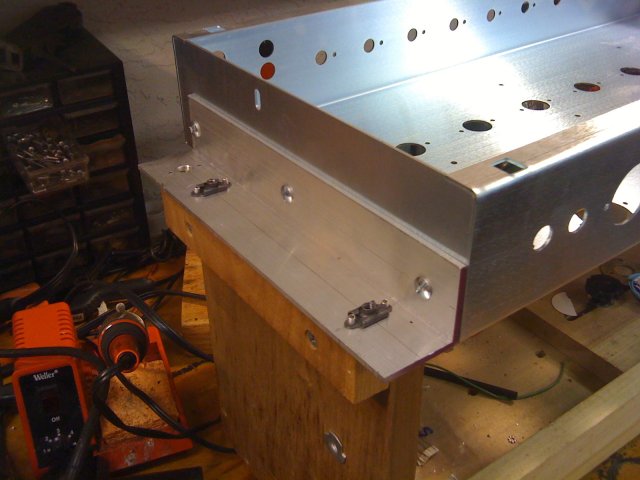
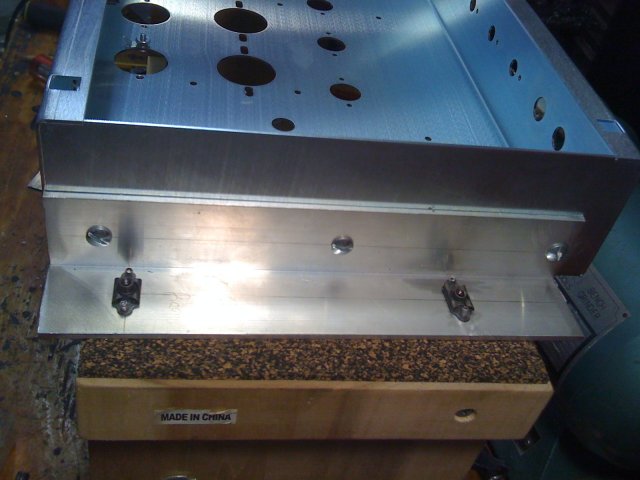
Since it's going in a combo, it mounts upside down. The OT bolted right up in the standard Hiwatt holes, but I needed to redrill 2 of the PT holes, as it's a little smaller than it's Hiwatt counterpart. The trannies are also quite a bit lighter than the Hiwatt iron, which will be nice in my combo. I am also considering some neo magnet speakers ( Tonkerlites perhaps) in this thing down the road. It'll make lifting this pig onto the amp stand at gigs a little easier!

Image

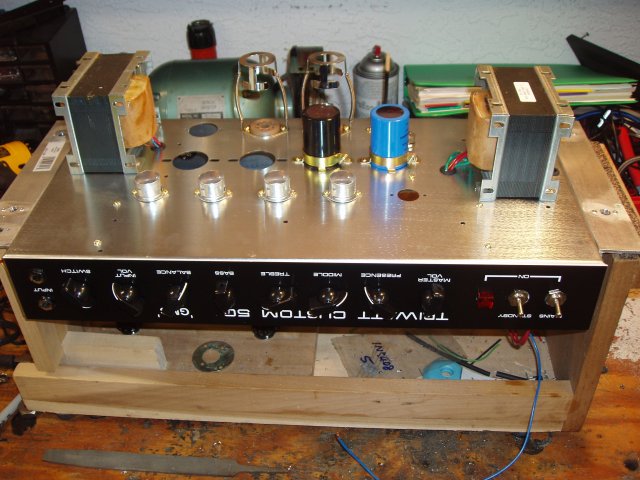
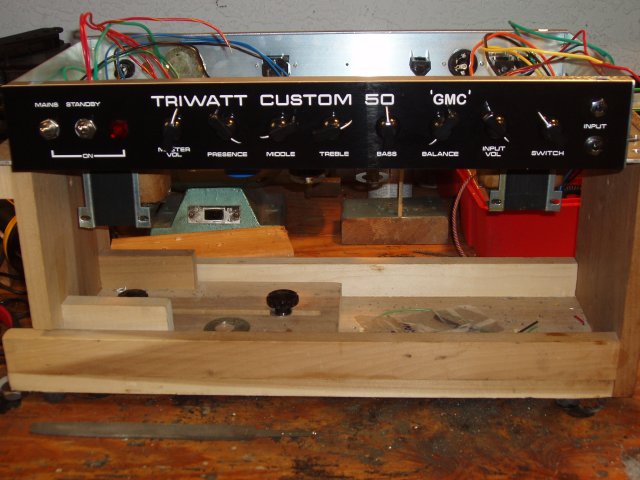
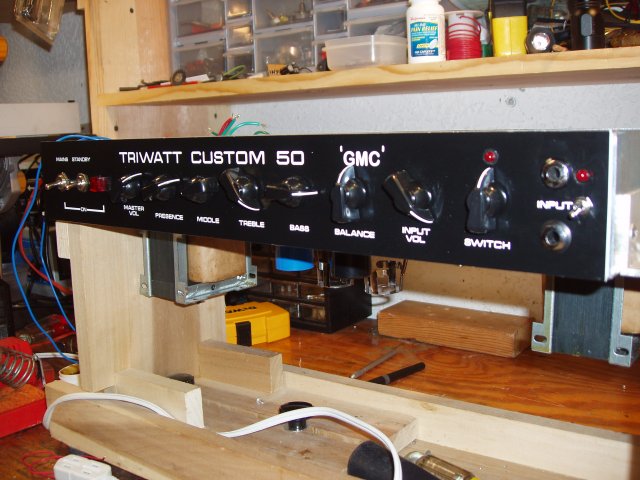
The faceplate is left over from my Jimmy Page 504 project. I made a subtle, yet stupid mistake when I ordered it, so I had it redone because it bugged me. I am going to have a correct one made for this project when I finalize the pot layout. More on that later.

I need to get some better power and standby switches, but these will do for now. I may swap these into my Marwatt and take the nice heavy duty ones out of it. Since the Triwatt has an extra pot for the OD, I had to decide whether to eliminate the standby switch and use that hole, or eliminate the "linked" input. I decided on the latter, as the holes for the switches/indicator light are spaced differently than the ones for the pots, and the one where the linked input would go is lined up perfectly. I'll either put a mini toggle in to link them, or just go old school, and use the Y cable like I do on my 2 hole DR504..... I may also move the OD switch/pot to the end hole to keep the wire to the board and V2 shorter.

Image

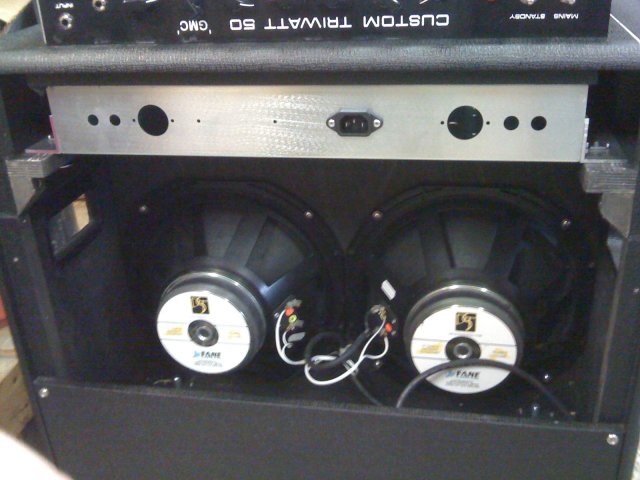
I used a Marshall type impedance selector that I had lying around. The extra jack is going to be for the OD footswitch. I left room in the middle for a possible future effects loop.

Image

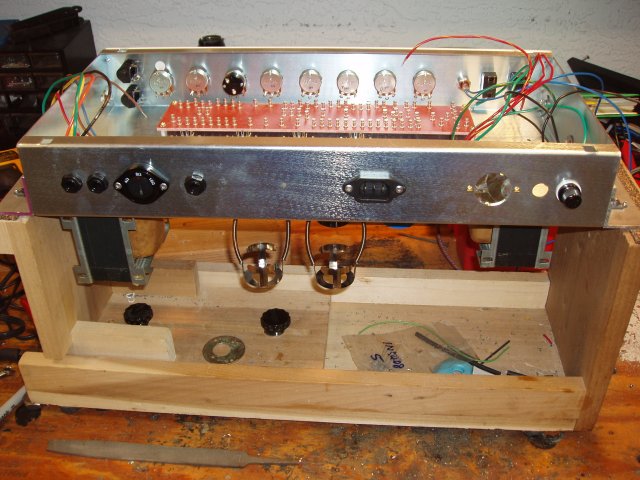
There is so much room, I think I can fit 2 Triwatts in this thing! The pot mounted vertically through the chassis is the bias pot.

Image

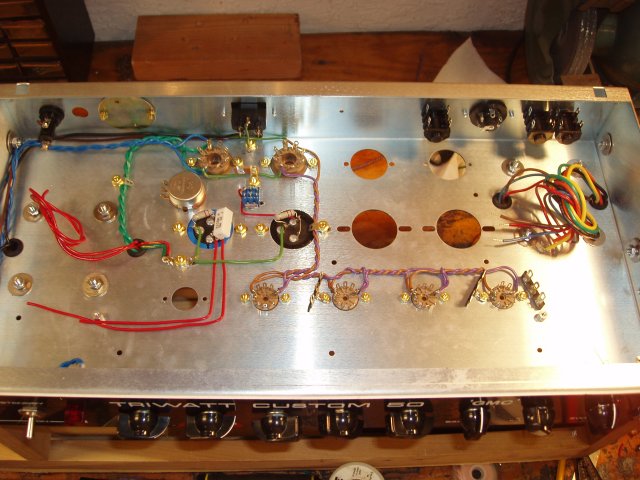
I just have to add a few more ground points and the bus bars. Then I'll fire up the iron and wire up the power stuff and heaters AFTER I get the intake back on the GTO!


Top
 Profile  
 
 Post subject:
PostPosted: Wed May 20, 2009 7:24 am 
Offline
Holy Ghost
Holy Ghost
User avatar

Joined: Sun Mar 13, 2005 4:10 pm
Posts: 7519
Location: Canada
Looking good. There is a lot of space in there. It will be interesting to see how this layout works with the iron at either end.

_________________
Stephen
Web: www.trinityamps.com. Facebook: facebook.com/trinityamps. Twitter: @trinityamps


Top
 Profile  
 
 Post subject:
PostPosted: Wed May 20, 2009 10:56 am 
Offline
Novice
Novice
User avatar

Joined: Wed Dec 03, 2008 11:24 am
Posts: 103
Location: Naples, FL
coco wrote:
Looking good. There is a lot of space in there. It will be interesting to see how this layout works with the iron at either end.


It worked for Hiwatt, so it should work here. I have to get my head unwrapped from the Hiwatt layouts I've been working with for the last few years, and figure the best way to lay it out.

The nice thing is that there's lots of room for moving the OD relay around and space for it's power supply etc.

As I said before, I am going to install a gutted "Red Box" for going direct into the board. I did it on my JP and love it. It sounds good enough to use a dummy load on the amp and play through the monitors and is super convenient at gigs, just one xlr needed to feed the board.


I am really excited to build this amp. This should fulfill my gigging needs perfectly!


Top
 Profile  
 
 Post subject:
PostPosted: Sun May 24, 2009 7:22 pm 
Offline
Expert
Expert
User avatar

Joined: Sun May 20, 2007 1:45 pm
Posts: 1254
Location: YYZ
coco wrote:
Looking good. There is a lot of space in there. It will be interesting to see how this layout works with the iron at either end.
Tripower455 wrote:
It worked for Hiwatt, so it should work here.

Sure I don't see why not, since you're dealing with a chassis that has a lot more space front to back. So the transformers and power section sit at the back of the chassis, and they don't (in theory) generate interference in the preamp. The nice thing about this approach is that the weight of the transformers is distributed evenly, so the amp is nicely weight-balanced when you pick it up.

With the TRIWATT we're using a smaller 18W-ish size chassis, and in order to keep the OT away from the preamp, we have to locate it at the PT end of the chassis. Then we put one of the transformers on its side relatove to the other, so that the PT doesn't cause hum on the OT.

_________________
Great tones come in small glass jars!


Top
 Profile  
 
 Post subject:
PostPosted: Sun May 24, 2009 7:45 pm 
Offline
Novice
Novice
User avatar

Joined: Wed Dec 03, 2008 11:24 am
Posts: 103
Location: Naples, FL
zaphod wrote:
coco wrote:
Looking good. There is a lot of space in there. It will be interesting to see how this layout works with the iron at either end.
Tripower455 wrote:
It worked for Hiwatt, so it should work here.

Sure I don't see why not, since you're dealing with a chassis that has a lot more space front to back. So the transformers and power section sit at the back of the chassis, and they don't (in theory) generate interference in the preamp. The nice thing about this approach is that the weight of the transformers is distributed evenly, so the amp is nicely weight-balanced when you pick it up.

With the TRIWATT we're using a smaller 18W-ish size chassis, and in order to keep the OT away from the preamp, we have to locate it at the PT end of the chassis. Then we put one of the transformers on its side relatove to the other, so that the PT doesn't cause hum on the OT.


My 2 Hiwatts I've built on these chassis are dead quiet. The only major difference between Hiwatts and the Triwatt is that the power supply is on a separate turret strip in the amp. We'll see if the Triwatt setup will work, but I am confidant that it's gonna be fine. Heck, it works in the smaller 18w chassis!


I have actually been working on this thing the last few days. I will post some pics later tonight.

The chassis assembly is almost complete. I installed a DPDT mini toggle to use instead of the now missing link input. I also installed LEDs in the faceplate for the OD circuit as well as the link circuit, which I am going to try to have footswitchable, using a standard TRS, 2 button footswitch. That would give me some flexibility for a rhythm/lead boost tone setup.

I dissected a bunch of wall warts to use for relay, red box and LED power. I settled on the first one I took apart, which was an old Dunlop pedal PS. It's 200MAH with a 13v secondary. It puts out 12v off the rectifier circuit, and 9ish out of a regulator. It's already got 1000uf and a 10uf filtering, so it should work.

I've got a couple of 12v relays in my parts bin, so I'm gonna use them. I'll tap power for the relays off the 12v part, and then use the 9V to power the red box, which is also gonna be built in. I'll run the LEDs off the relay boards, stepped down with resistors.

This is gonna be a cool amp!


Top
 Profile  
 
 Post subject:
PostPosted: Sun May 24, 2009 7:47 pm 
Offline
Holy Ghost
Holy Ghost
User avatar

Joined: Sun Mar 13, 2005 4:10 pm
Posts: 7519
Location: Canada
Of course the HIWATT boards were designed to deliver output at the opposite end of the amp. So there are two boards as a result! We have one board = easier build. It will be interesting to see how noise sensitive the TRIWATT is to moving the OT to the far end.

_________________
Stephen
Web: www.trinityamps.com. Facebook: facebook.com/trinityamps. Twitter: @trinityamps


Top
 Profile  
 
 Post subject:
PostPosted: Mon May 25, 2009 12:52 am 
Offline
Novice
Novice
User avatar

Joined: Wed Dec 03, 2008 11:24 am
Posts: 103
Location: Naples, FL
coco wrote:
Of course the HIWATT boards were designed to deliver output at the opposite end of the amp. So there are two boards as a result! We have one board = easier build. It will be interesting to see how noise sensitive the TRIWATT is to moving the OT to the far end.


We're gonna find out! You think it'll be noisy?

I am looking forward to assembling the board.

I got a little done on the chassis tonight..... I actually burned some solder for the first time in this project!

I moved the OD pot/switch to the end of the line, it's now in the hole marked "Switch". I also added an LED over the pot, which will be switched via the second side of the relay using the pull switch or footswitch. The switch on the far right is to link the 2 inputs. The LED will indicat when they are linked. This might also get footswitch activation.....


Image

Assembled chassis......

Image

I got the PT filter caps and heaters wired. I had to redo the preamp heaters, because I originally had the wires running between the filter caps, and they were real close to a lot of other stuff. I moved them to the other side, which should be satisfactory, but I am not too happy with the dress, and might redo them.

Image

Image


Top
 Profile  
 
Display posts from previous:  Sort by  
Post new topic Reply to topic  [ 113 posts ]  Go to page 1, 2, 3, 4, 5, 6  Next

All times are UTC - 5 hours [ DST ]


Who is online

Users browsing this forum: No registered users and 11 guests


You cannot post new topics in this forum
You cannot reply to topics in this forum
You cannot edit your posts in this forum
You cannot delete your posts in this forum
You cannot post attachments in this forum

Search for:
Jump to:  
Powered by phpBB® Forum Software © phpBB Group